1/23/10

HTML codes

Since I told you how to make your own links using HTML codes yesterday, I thought today I would show you a few other HTML codes that I use often. Don't forget to NOT include the red parenthesis.

1. Centering videos, text and pictures in posts and sidebar widgets.

When you put a video into your post it doesn't show up until you preview it so you can't just click on it to center it.


What you need is the "center" HTML. Simply go to "Edit Html" and add the code. You are going to add (<)center> before the video's code and (<)/center> after it. Notice the / in the second code. That is closing the code which basically means it will center everything from the beginning of the code (the original "center") to the end of the code (the "/center").

And your video will be centered:


Also, there are two places in the video code that say "width" and "height". You can make your video change size if it doesn't fit into your post the way you want it to. Say I want it to be half that size....I'd change those numbers to 213 and 172. Make sure you change BOTH sets of numbers though! So then my video would look like this:


You can play around with it and make it whatever size you want :)

The "center" code works the same way with text and HTML code pictures too. Just insert the opening (<)center> at the beginning and the closing (<)/center> at the end.

I often use the "Text" widget on my sidebars and they don't offer a lot of HTML options.

2. To make words bigger you will need to use the "big" HTML:

(<)big>the words in between will be bigger(<)/big>

the words in between will be bigger

(<)big>(<)big>(<)big>(<)big>the more you put, the bigger they will be(<)/big>(<)/big>(<)/big>(<)/big>

the more you put, the bigger they will be

3. To underline words, use the "underline" HTML

(<)u>These words will be underlined(<)/u>

These words will be underlined

4. I have a lot of fun with the "strike" HTML code

(<)strike>Some(<)/strike> people think I'm (<)strike>crazy(<)/strike> fun

Some people think I'm crazy fun

5. And the final code I'll show you today is one I use all the time. It's a heart: ♥ To make one (which I don't know why you'd want to...it's kind of an obsession of mine LOL) just put the following:

(&)hearts;

Have a great Saturday everyone!! See you tomorrow if all goes well :)

post signature

1/22/10

How to add links

If you've followed any of my blogs for any amount of time then you know that I love links. I link to other blogs, I link to websites I like, I link to stories I've read, I even put links in my comments sometimes.

Today I'd like to tell you two ways to improve your linky love.

The first is how to open your links in a new window. I always try to do this because I don't want people to lose my blog while they wander off to check out my links.

Say I want to link to my Happy At Home blog...

Go ahead, click it. I'll wait here...

Back? Yay! What I did was add a line to my HTML that makes that link open in a new window. After I highlighted the words "Happy At Home blog", I clicked the Link button up there on the top of this post. It looks like a world with a chain link over it. (I'm sure most of you know how to link things but I'm trying to write these tips as if you know NOTHING about this stuff...please ignore me if you already know what I'm talking about :D )

Then I went to the little tab that says Edit Html.

Where I added the link it looks like this:

Say I want to link to my (<)a href="http://katshappyathome.blogspot.com/">Happy At Home blog(<)/a>

*Remember that the red parenthesis are not a part of the code. I have to put them to show you the code.*

To make that link open in another page, I'm going to add the following code:

(there is a space here) target="_blank"

So now my code looks like this:

Say I want to link to my (<)a href="http://katshappyathome.blogspot.com/" target="_blank">Happy At Home blog(<)/a>

Ta Da! Your link now opens in a new window and your original post is still open for people to go back to :)

The other linky love I wanted to show you today is how to put links into your comments. I'm sure you've seen people leave links in comments. Sometimes they leave links to their blogs so that you can find them. I like to use it to link back to a specific post, like if I gave you an award or something like that.

Here's my example comment:

Hi! I wanted to show off some of the new blogs I'm following. To see them click HERE.

Or you can visit me on any of my blogs. They are Happy At Home, This Crazy Adventure I Call Life, Blog Love and The Eat Food NOT Money Cookbook. Thanks!


Now I know that's a lot of links for one comment and I probably wouldn't put that many links in one comment BUT if I wanted to all I'd have to do is add the following code to each part I wanted links added to:

(<)a href="the URL I want to link to">The words I want linked(<)/a>

You notice I did NOT put the target="_blank" code. That's because most comment sections won't accept that HTML.

So the first line of my comment would look like this before it was published:

Hi! I wanted to show off some of the new blogs I'm following. To see them click (<)a href="http://katsbloglove.blogspot.com/2010/01/new-love.html">HERE(<)/a>

I suggest that when you add a link to a comment, you preview it before you publish it. Especially if you are commenting on a blog that uses comment moderation. That way you can make sure it looks right before it disappears. And don't forget to not include the red parenthesis!

That's about it for today :) Hopefully I'll see y'all tomorrow! Happy Friday everyone!


post signature

1/21/10

Templates that you'll love

I am the first one to tell you that I change my Blogger template occasionally, sometimes often. Most of the time this happens late at night when my mind is not exactly awake :)

I have found some really awesome sites that provide Blogger templates during these late night play times and thought that today I would share them with you. Oh, and if it says "download template" don't get scared and leave that site, I'll tell you exactly what to do with that template in just a little bit...

One more Oh...my links will open in a new page so if you want to look at the sites as I talk about them then please do!

For simple-insert-the-HTML-and-be-done-with-it-templates, go to Pyzam. (Just so you are aware, I do get pop-ups from this site but I've never gotten a virus there. Just close the pop-up when it opens or don't use this site if it makes you nervous.)

1. When you find a template you think you may like, select "preview" so that you can see what it looks like full screen.

2. If you want that template, there will be a place that says "get the code". Copy the code.

3. Go to your Blogger dashboard/Layout/Edit HTML. You'll see your current templates HTML.

4. Right click in the template HTML area and choose "Select all". Right click again and choose "paste".

5. Go to the bottom of the HTML box (underneath it) and select "Preview". Your blog will open in a new window. Make sure it looks like you want it to look before you choose "Save template". There's no going back once you save it.

6. It will tell you that any widgets you have on your blog at the current time are going to be deleted. Sorry....they are. You will have to reinstall them into your new template. If that's ok with you then hit "Confirm and save".

*An easy way to save yourself some work in reinstalling the widgets is to open your notepad and copy & paste all the HTML from your old widgets onto it. Then all you have to do is copy & paste them back into your new widgets.*

7. Reinstall any widgets you want on your blog from the "Page elements" section under "Layout". Be sure to preview your blog and make sure it looks like you want it to look. Save it when you're done.

That's it. Your new template is finished :)

Another place that I really like to get new templates is Final Sense. You do the same thing for those templates that I just told you. They have some really pretty ones there.

The other two sites that I wanted to share with you involve downloading the template and take just a little bit more work but to me they are completely worth it. They have some of the coolest templates I've found in all my time of blogging.

They are Deluxe Templates and BTemplates.

1. Find the template you want.

2. Choose "Download".

3. A page usually opens that wants you to confirm if you want to download. If it does, select "download".

4. Your computer should open a box that asks you what you want to do with this file. It will tell you that it's a Compressed (zipped) Folder. Tell it "Save File".

5. Go to your downloads on your computer and find the file that you just downloaded.

6. Right click on the Zipped Folder and click "Extract All". It should open a window telling you where it's going to extract it to. Usually that place is perfectly fine. Choose "Extract".

7. It should open a new window with the file that just got extracted. Double click on that folder and make sure that there is a file type "XML document".

8. Go to your Blogger dashboard/Layout/Edit HTML

9. At the top of that page it says "Upload a template from a file on your hard drive:" Select "Browse" and find the folder that you just extracted. Double click it and select the XML document. It will fill in the box. Now choose "Upload".

*I do suggest that you "Download Full Template" BEFORE you upload a new one just in case you don't like the new one you can go back to the old one.*

10. "Preview" and then "Save Template" if you like it. Again, you will have to reinstall any widgets you have on your current template. It should also ask you to "Confirm and Save" without the widgets.

That's it! Now you have a beautiful new template :) I believe being happy with the way your blog looks is important. Have fun with it! And make it yours!


post signature

1/19/10

Facebook, MySpace and your blogs (plus a short note from me)

I told you that I would let you know about Facebook and MySpace today and I always try to do the things I say I'm going to do :)

First, MySpace HATES my blogs. They really do. Tom (the founder of MySpace) says they are spam and if I post a link to them ANYWHERE (on my page, on the bulletin board, on my blog there, in my status) you get sent to a message that says they are spam and won't let you get here. Booooo!

Basically I'm telling you that MySpace is not the place for blogs unless they are the MySpace blogs. I do post the addresses to my blogs there regardless of being called spam and I just tell people to copy and paste the address to visit me here. It's up to you if you want to do that.

Facebook, on the other hand, is an excellent place for your blogs. They have an application there called NetworkedBlogs. You may have noticed the widget on my sidebar. It's an awesome little application. And very simple too.

When you log into your Facebook account, go to search applications and put in NetworkedBlogs (which I'm going to call NB for the rest of this post). I suggest that you become a fan. It's worth the fan status :)

On the home page of NB, find the box that says "claim your blog". Put in the URL of your blog. It will ask you if you are the author of that blog. Tell it yes. You have a choice of either letting your friends verify that it's your blog (which I've never done) or verifying it right then by putting the widget that you see on my sidebar onto your blog (that's what I've done all 4 times I've claimed a blog there).

Open a new tab to put the widget on your blog so that you can keep the NB page open also.
Go to your Blogger dashboard/Layout/Add a gadget/HTML/Javascript and paste the code into that gadget. Preview your blog then save.

Now go back to the NB page and select "Verify" at the bottom of the page. It will search for the widget on your blog and accept you pretty much immediately.

Once you are accepted, set up your feed settings and anything else you want to set up there. It's all pretty easy to figure out.

The only other suggestion I have for NB is using the invite your friends option. On the right hand side (on your profile on NB...just click the name of your blog if you don't see this) it says "Invite People to Follow". When you click on that, it shows your friends on Facebook. Invite up to 20 people a day to follow you.

As an added note, I'm Kathy Brakhage on Facebook and all my blogs (including this one) are on NB. Follow me. Add me as a friend. Whichever (or both) that you want to do....I like friends and followers :)

Ok.

Now onto the short note I eluded to in the title.

Our internet may be shut off here very soon. If it is, I will continue to post at least once a week from the library. It's awful. It makes me sad. I want to scream. But that won't help. :) Just know that I haven't abandoned you and I WILL be back! Have a nice day everyone ♥


post signature


UPDATE: MySpace is now allowing you to add links to your status so eventually they may come around to allowing you to add your blogs to your page there too. Yay! 4/10/10

1/18/10

A few more ways to use your feeds

Ok, today is the last day I'm going to talk about feeds but I wanted to tell you a few more ways to use them.

1. Use it to let people subscribe to your posts and/or your comments:

a) From your Blogger dashboard, go to Layout

b) Select Add a Gadget

c) Add the gadget: Subscription Links. It will pull your feed for you. All you have to do is decide where you want it on your page.

d) Preview your blog and make sure it looks the way you want it to look.

e) Save your template

2. Use it to show off your feed on another blog or the sidebar of your blog:

a) From your Blogger dashboard, go to Layout

b) Select Add a Gadget

c) Add the gadget: Feed

d) Put your feed URL into the box and select continue. It will pull the feed for you.

e) Put it where you want it on your blog

f) Preview your blog and make sure it looks the way you want it to look

g) Save your template

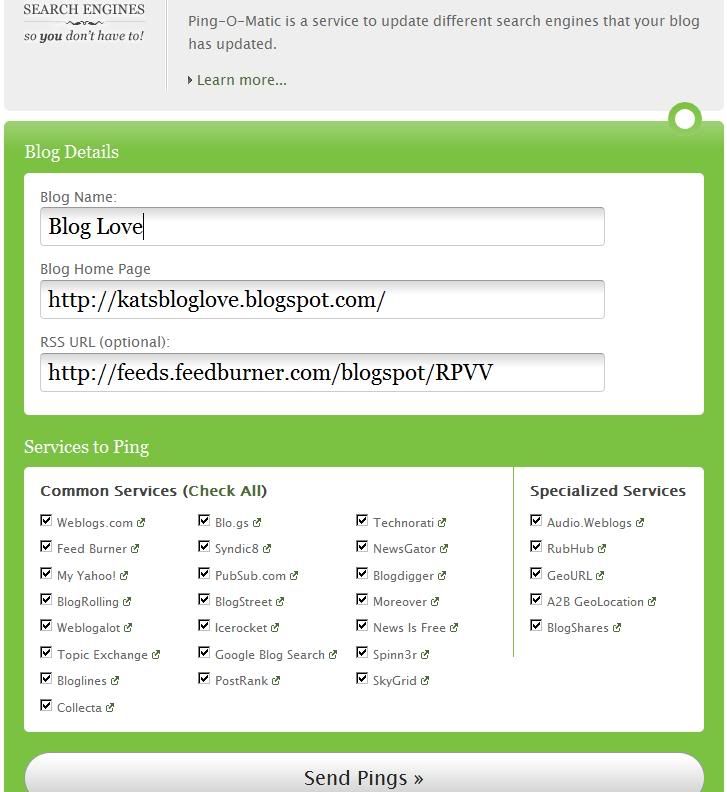
3. Use it to "ping" your blog. Pinging is a service that tells search engines and other things that use your feed that you have updated your blog. A good, and free, pinging service is Pingomatic.

a) Go here. It looks like this:

blog feeds ping

b) Enter all your information.

c) Check all the boxes.

d) Click on "Send Pings"

4. Use your feed on NetworkedBlogs on Facebook. It's a pretty cool place to show off your blog and find new readers. I'll tell you more about that one tomorrow along with some other things about Facebook and MySpace :)

Have a great day everyone!


post signature

1/17/10

New love ♥

I was so pleased yesterday when I visited my friend Amy over at Keeping up with the Schultz Family and saw that not only did she write a lovely post about the award I gave her but she gave me an award in return!! How neat is that?! Here's my award:

Yay!! Thank you so much Amy ♥ If y'all don't visit her already, you're really missing out. She's a great girl with lots of fun stuff going on at her blog. Just click on the name of her blog above to visit her.

Now speaking of visiting blogs....

I'd like to encourage you to keep your eye on my blog list that on the sidebar of this blog. It changes :)

Whenever I find a new blog that I like, I add it. I've added several recently. They are:

Visit them! I think you'll like them just as much as I do :)

While we're showing things off. Two of the blogs up there have buttons. Yay! You know I loooove buttons!! Here they are:

Ok guys, that's all my love for today ♥ I hope you all have a wonderful Sunday! I'll see you tomorrow :-)

post signature

Your feed settings

Now that you have your feed all set up and your Twitter linked to it, I wanted to show you some things to do to optimize your feed.

Start out by going to your feeds...

1. From your Blogger dashboard, click on My Account in the top right hand corner.

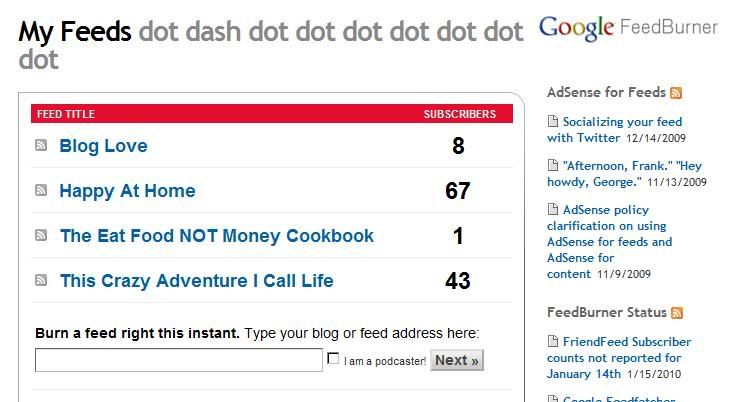
2. Click on Feedburner. That takes you to your feeds. My page looks like this:

blog love, feeds

3. Click on the name of the feed you want to work with.

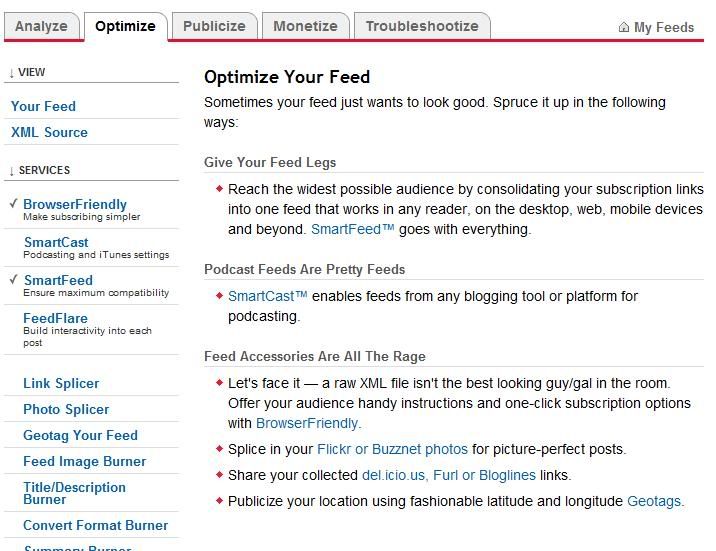
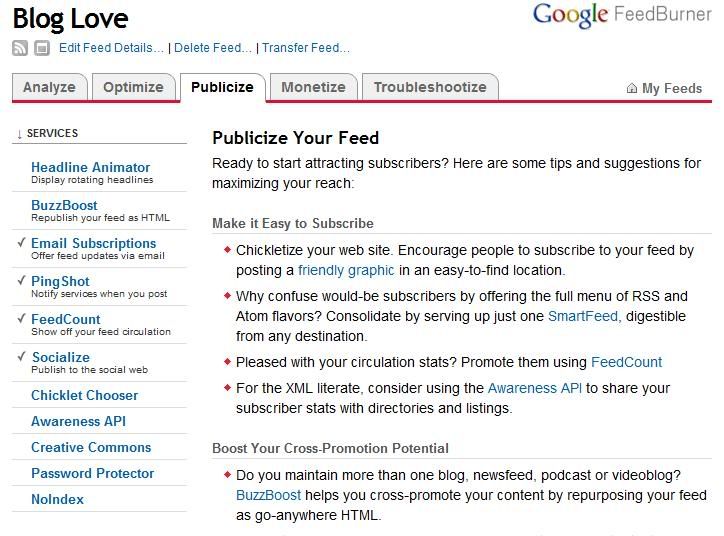
4. First we're going to optimize your feed. Click on that tab on the top:

blog love, feeds

As you can see, I have this blogs feed set to BrowserFriendly and SmartFeed. When you click on each item in the sidebar, it gives you a brief description of what that particular item does for you. You can choose as many as you want or none at all. Just be sure to save anything you activate at the bottom of each page.

A little about the two items I am using:

BrowserFriendly: Make it easy for potential subscribers to preview and subscribe to your text or podcast feed. Applies clean visual formatting to the eyesore of raw feed XML for much improved readability in all modern web browsers.

SmartFeed: Reach the widest possible audience while publishing a single feed on your blog or site. Translates your feed on-the-fly into a format (RSS or Atom) compatible with your visitors' feed reader application.

Just explore the different options available and don't be scared of them :) You can't mess anything up. I promise.

Now we're going to advertise your feed so that you can get more readers.

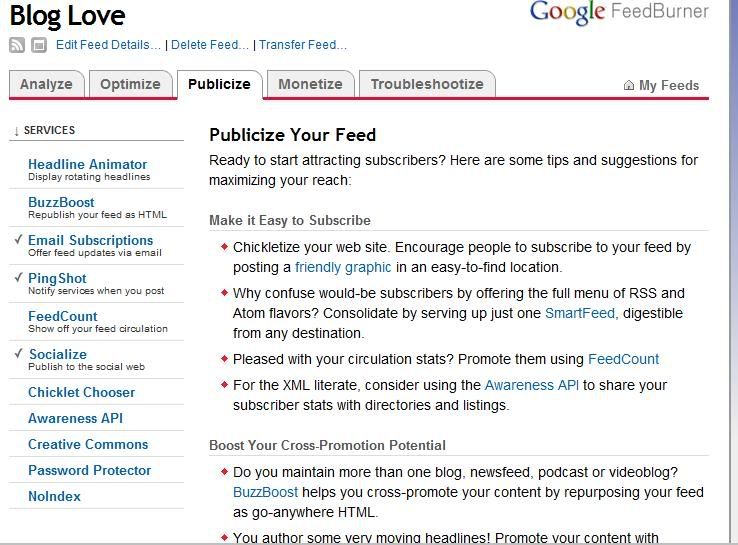
1. Go to the Publicize tab:

blog love, feeds

2. Yesterday you set up your Twitter feed under the Socialize section so that should have a check mark by it. If you want people to be able to subscribe to your blog through their email then click the option that says Email Subscriptions. I also suggest you check the Ping Shot option. That notifies people, services and search engines when you update your blog (write a new post).

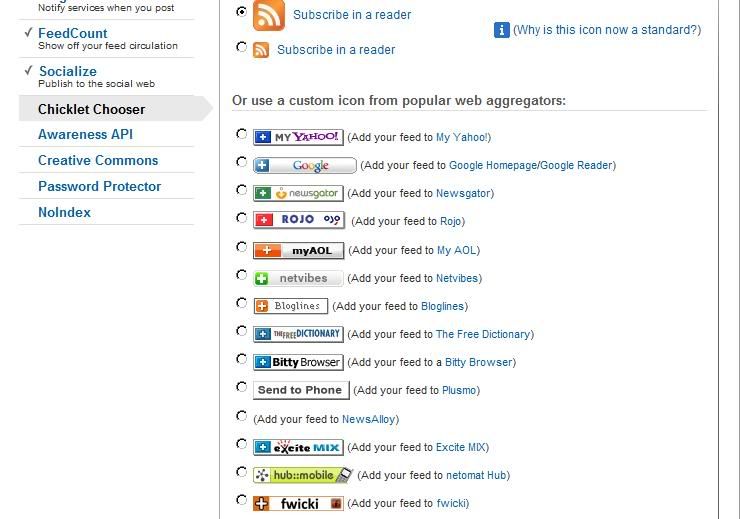
3. Now you want to go to Chicklet Chooser:

blog love, feeds
You can choose any of the readers that you want but I usually choose the top one that says Subscribe in a reader. With that option and the settings from step #4 above, it gives them several readers to choose from instead of just the one if, for example, you chose to use the Bloglines feed chicklet.

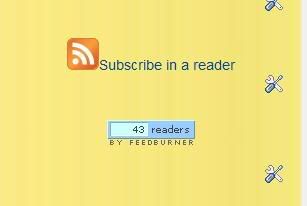
(On this blog my RSS feed is built into my template so I don't have the chicklet here BUT I do have it on all my other blogs. Here's what it looks like on my Crazy Life blog:

blog love, feeds)

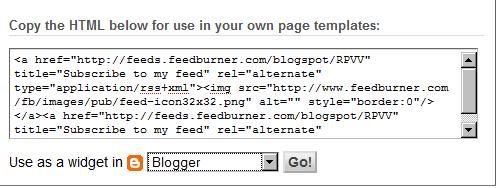
4. Either get the HTML for your chicklet from the bottom of that page

blog love, feeds


Add it to your layout: Go to Blogger dashboard/Layout/Page Elements/Add a gadget/HTML/Javascript and paste the code into it.

Or you can tell it to Use as a widget in Blogger (see it below the code in the above picture?) and it will automatically add it for you. You can then move it around by going to your Layout page under Page Elements. Be sure to save it after you get it where you want it!

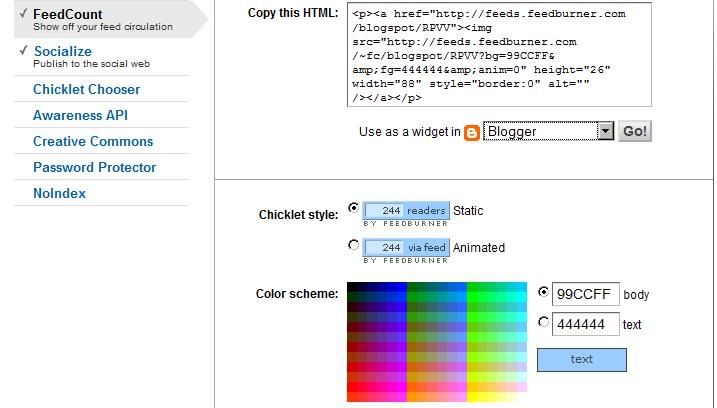
5. If you want to show off how many people you have subscribed to your feed (see the little blue button just underneath my Subscribe in a reader chicklet up there?) then on your feed on Feedburner go to Publicize and then Feed Count on the sidebar. You will get a page that looks like this:

blog love, feeds

Choose the colors you want and if you want it to just say "readers" or to be animated (that one goes between "via feed" and "readers") then activate it at the bottom and then save it. Either copy the HTML and post it to your blog in the same way you did the chicklet or tell it to save it for you. Just be sure it's set to use as a widget in Blogger :)

That's it! You're all set up! Tomorrow I'll tell you a couple more ways you can use your feeds and then we'll move on to a new subject :D Have a great day everyone!


post signature

1/16/10

How to "tweet" your feed

Yesterday I told you how to set up a feed for your blog. Today I'm going to tell you one of the ways you can use that feed to promote your blog.

The first thing you need is a Twitter account. If you don't have one, set one up by clicking here. It's super simple and, of course, free :)

Got one? Great! Here's what you do:

1. Go to your Blogger dashboard and click on My Account in the upper right hand corner.

2. Choose Feedburner. It will take you to a page that says "My Feeds". Click on the name of your blog that you want to set up the tweets for. (I am always saying this part because I have 4 blogs with feeds set up and I have to choose which one I'm working with. If you only have 1 then that's all that you'll see...)

3. Now click on the tab that says "Publicize" on the top. It looks like this:

blog love, twitter

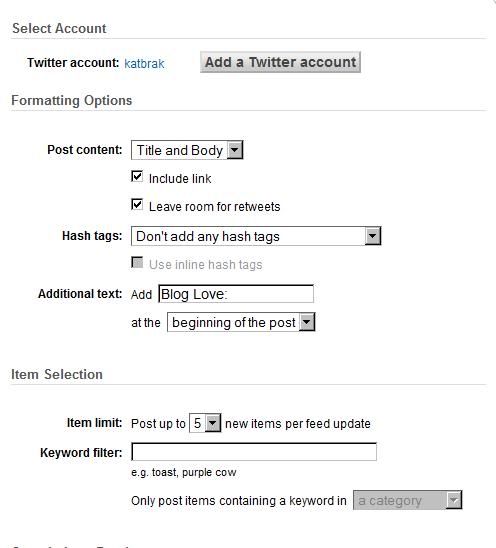
4. Now click on "Socialize" on the left hand side. Do you see it up there? It will take you to a page that looks like this:

blog love, twitter

5. Click "Add a Twitter account". It will take you to a separate page that will ask you if you want to "allow" or "deny" this action. Tell it "allow". It will then link your Twitter account to your feed. See how it says "katbrak" by Twitter account in the above picture? That's me :)

6. Set up the Formatting options...

I have mine set to show the Title and Body. That shows the title of my post and a small snippet of my post each time.

You want to check the box that says "Include link". That will put a link to your post in the tweet.

You also want to check the box that says "Leave room for retweets". This lets other people "retweet" your tweet and show your post on their Twitter page.

You can add additional text if you'd like. I do because of the fact that I have 4 blogs. I want to differentiate between them. Mine are set up as: Crazy Life, Happy at Home, Blog Love and My Cookbook.

7. Go to the bottom of the page and select "Activate this service". It will say "this service is active" after you do that.

8. Now select "save". Be sure to save it after your done!

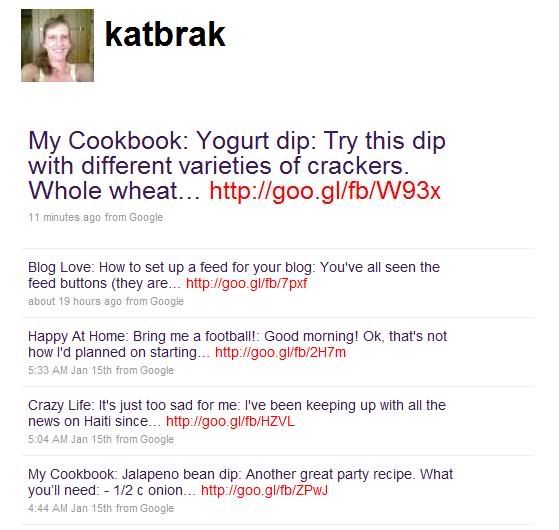
Congratulations! Your feed is now set up with your Twitter account! Now each time you post, you will automatically tweet your feed. This is what that looks like:

blog love, twitter

Pretty cool, huh?! Now 18 million Twitter users have the chance to find out about your blog!


post signature

1/15/10

How to set up a feed for your blog

You've all seen the feed buttons (they are usually orange) on people's blogs I'm sure. Those feeds are there to allow people to read your blog in a reader, follow your feed on their homepage and several other things (I'll tell you tomorrow how to set your feed up to automatically post to your Twitter account whenever you write a post, for example.) This is what they usually look like:

Photobucket

Today I'm going to tell you how to set that feed up.

1. Go to your Blogger dashboard (for Wordpress users just go here and then skip down to #4.)

2. In the upper right hand corner there is "My Account". Click on it. It will take you to your Google account page.

3. In the lower half of that page there are products. Select "Feedburner". (There is a little flame next to it: Photobucket)

4. In the box, look for the words "Burn a feed right this instant. Type your blog or feed address here:" Type your blog URL into the box and hit NEXT.

5. Follow the directions. It's pretty easy. Just do what it tells you to do.

6. When your finished it will go to a page with your blog name at the top of it. It will say something like "the bubble wrap isn't off your feed yet. Come back later for your stats" (I'm paraphrasing that but it's pretty close...)

7. Just underneath your blog title is a little black and white feed button like the orange one above. Click it. It will take you to your blog feed in a new window.

8. Copy the address from the address bar at the top of your screen. (For example, the feed address for THIS blog is http://feeds.feedburner.com/blogspot/RPVV) Just right click on the address bar and select "copy".

9. Go back to your Blogger dashboard

10. Go to "Settings" on the blog you just set the feed up for.

11. Now go to "Site Feed".

12. Find the box that says "Post Feed Redirect URL" and right click and select "paste" to put your feed's URL into that box.

13. Go to the bottom of the page and select "Save Settings".

That's it! Your feed is now set up! Congrats! You can go back to Feedburner at any time and see things like how many subscribers you have, your blog traffic and where your feeds were viewed from. I'll tell you starting tomorrow other ways you can use your feed :)

post signature

1/14/10

How to make your own blog button

I'm going to tell you step by step how to make your own blog button...you know, those cute little pictures people (like me) have on their sidebars that say Grab My Button...I know you want your own! It's VERY simple...don't worry!!

The steps are exactly the same for Blogger and the free version of Wordpress (if you pay for your blog site on Wordpress then you have to install the plugin and since I only use free stuff that's all I'm going to tell you about. There are instructions on Wordpress for the paid version...) until you get to the end so we'll start at the beginning....

1. Pick a picture. It can be any picture you want. It can be one of your pictures or it can be a picture off of Photobucket. I used a picture off of Photobucket for this blog button. I just searched for hearts and found one I liked.

2. Save the picture to your Photobucket album (either upload it or "copy to my album"). If you don't have a Photobucket account, make one. It's free (you know it is because I told you all I use is free stuff *wink*).

3. Edit your picture to make it look like you want. I added a frame to my heart picture I found and then added the text "Blog Love". The photo editor is very easy to use on Photobucket. Trust me. I like easy stuff too :)

4. Save a copy of your new picture.

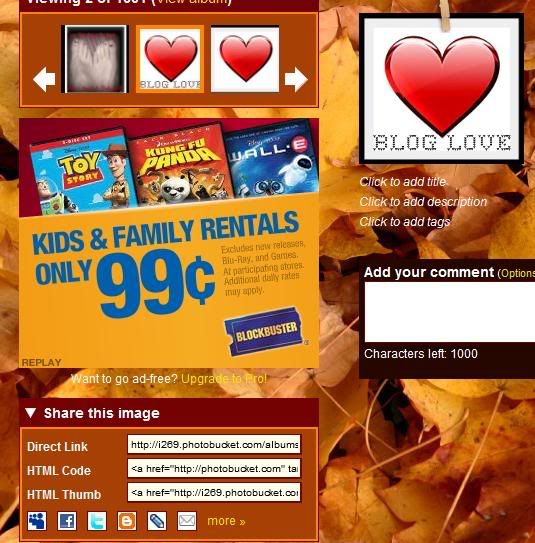
5. Click on the picture that you just made in your album. It will look something like this:

Photobucket

See the part that says Direct Link? That's the part you're going to need.

Here's where Wordpress and Blogger part company.

For Blogger:
1. Go to your Dashboard and select "Layout" for the blog you want to add the button to.

2. Select "Add a Gadget".

3. Select "HTML/JavaScript".

4. Paste the following code into the box (the red words are words you are going to change; I'll tell you that part in a minute):

(<)center>Grab MY button :)

(<)br/(><)br/(>)

(<)img src="YOUR PICTURE DIRECT LINK"/>

(<)br/(><)br/(>)

(<)textarea rows="4" cols="20"(><)a border="0" href="YOUR BLOG URL/" target="_blank"> (<)img src="YOUR PICTURE DIRECT LINK"/>

You can make the Grab My Button text say anything you want it to say. Add me, Grab my button, This is me....whatever :) Where it says your blog URL put your blogs URL. For example, this blogs URL is http://katsbloglove.blogspot.com/ so that section would look like this:

(<)a href="http://katsbloglove.blogspot.com/" target="_blank">
Where it says your picture direct link, copy the direct link I showed you above and put it in place of the red letters. Mine would look like this:

(<)img src="http://i269.photobucket.com/albums/jj57/mommacow39/love-heart-1-1.jpg"/>
5. Remove all the parenthesis. I had to put them in to be able to show you the code. If I tried to just show you the code it would have just showed you my button :) They are all in red. Just delete them.

6. Preview your blog and make sure it looks something like this where you put the blog button:


Grab MY button :)



Ta Da! You now have a blog button!

For the free version of Wordpress:

1. Go to your Dashboard and under "Appearance" select "Widgets".

2. Add a "Text" widget to your sidebar (underneath the word TEXT it says "Arbitrary text or HTML").

3. Give it a title. Something like "Add my button" or whatever you want it to say.

4. Paste the following code into the text area:

(<)a href="YOUR BLOG URL" target="_blank"(><)img src="YOUR PICTURE DIRECT LINK" alt="YOUR PICTURE NAME" width="150" height="150" />

5. Change the URL, direct link and picture name. Remove parenthesis.

6. Now type the following code onto your notepad or some other word processing page:

(<)div style="border:1px solid #DDD;background:#F8F8F8 none repeat scroll 0 0;overflow:auto;height:100px;line-height:1.5em;margin:auto;padding:5px 10px;"(><)a href="YOUR BLOG URL" target="_blank"(><)img src="YOUR PICTURE DIRECT LINK" alt="YOUR PICTURE NAME" width="150" height="150" />

7. Change the URL, direct link and picture name. Remove parenthesis. Copy it.

8. Go here.

9. Paste the code into the box in the center of the screen and push the gray button that says "HTML to Text". (This is necessary because Wordpress assumes your HTML is incorrect and changes it...you have to fool them a little.) It will give you a code that looks something like this:

& lt; div style="border:1px solid #DDD;background:#F8F8F8 none repeat scroll 0 0;overflow:auto;height:100px;line-height:1.5em;margin:auto;padding:5px 10px;"><a href="http://theeatfoodnotmoneycookbook.wordpress.com" target="_blank"><img src="http://i269.photobucket.com/albums/jj57/mommacow39/cookbooktitle-2-1.jpg" alt="cookbookbutton" width="150" height="150" /></a></div & gt;

10. Paste that code underneath the first code you put in the text widget.

11. Hit save.

12. View your blog to make sure it looks right.

You're done! Congratulations! You now have a button on your Wordpress blog (a place that really doesn't like buttons as you can tell!).

Just leave me a comment if you have ANY questions. I can walk you through it step by step personally if I'm too confusing for you here. I totally understand that I CAN be confusing sometimes :)


post signature

Your blog buttons

I'm surprised that more of you don't have buttons! Maybe my next post (how to create your own blog button) will make that change :) Click on the pictures to visit the blogs and have fun!

Photobucket Photobucket Mama's Losin' It Photobucket


post signature

Prizes ♥

I tell people all the time that you can really win prizes here in blogland. Here are the prizes that I have won up to this point. They are in no particular order. If you click the picture it will take you to the post I wrote about each one and if you click the blog name that I won it from, it will take you to that blog. I just loved every single one of them!! ♥


Vanilla beans won from Screaming for Chocolate

Sherri's VIP prize ribbon won from Matter of Fact

Spring Fling giveaway pack won from Everything in Moderation

I haven't received this prize yet but when I do, I will show you immediately! It is the grand prize for Sherri's Silly Saturday Caption Contest won from Matter of Fact

Pet Care package won from Angela's Adventures and Minor Mishaps

Collage won from Tu Tu's Bliss

Blog button won from Tu Tu's Bliss

Glade candle won from A Nut In A Nutshell

Chanel bag won from Screaming For Chocolate


Bookmarks won from Work of The Poet


post signature

My blog buttons

Grab my buttons and add them to your blog :)
Or just click on them to visit my sites!


post signature

Get Free Shots from Snap.com