 Twitter
 Facebook
 Kats Kreations
 **Blog Tips**
 RSS
RSSThe steps are exactly the same for Blogger and the free version of Wordpress (if you pay for your blog site on Wordpress then you have to install the plugin and since I only use free stuff that's all I'm going to tell you about. There are instructions on Wordpress for the paid version...) until you get to the end so we'll start at the beginning....
1. Pick a picture. It can be any picture you want. It can be one of your pictures or it can be a picture off of Photobucket. I used a picture off of Photobucket for this blog button. I just searched for hearts and found one I liked.
2. Save the picture to your Photobucket album (either upload it or "copy to my album"). If you don't have a Photobucket account, make one. It's free (you know it is because I told you all I use is free stuff *wink*).
3. Edit your picture to make it look like you want. I added a frame to my heart picture I found and then added the text "Blog Love". The photo editor is very easy to use on Photobucket. Trust me. I like easy stuff too :)
4. Save a copy of your new picture.
5. Click on the picture that you just made in your album. It will look something like this:
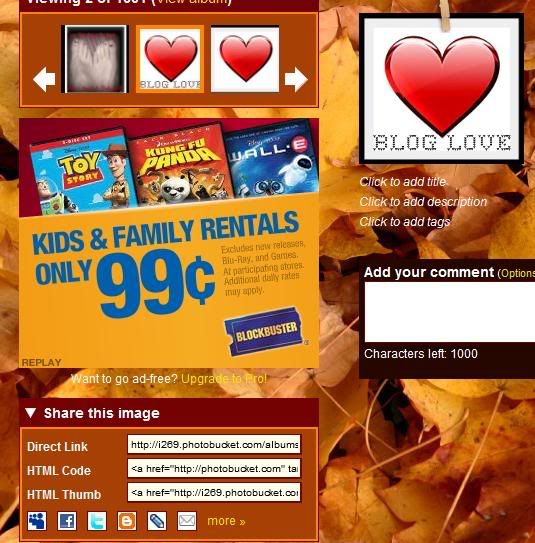
See the part that says Direct Link? That's the part you're going to need.
Here's where Wordpress and Blogger part company.
For Blogger:
1. Go to your Dashboard and select "Layout" for the blog you want to add the button to.
2. Select "Add a Gadget".
3. Select "HTML/JavaScript".
4. Paste the following code into the box (the red words are words you are going to change; I'll tell you that part in a minute):
(<)center>Grab MY button :)
(<)br/(><)br/(>)
(<)img src="YOUR PICTURE DIRECT LINK"/>
(<)br/(><)br/(>)
(<)textarea rows="4" cols="20"(><)a border="0" href="YOUR BLOG URL/" target="_blank"> (<)img src="YOUR PICTURE DIRECT LINK"/>
You can make the Grab My Button text say anything you want it to say. Add me, Grab my button, This is me....whatever :) Where it says your blog URL put your blogs URL. For example, this blogs URL is http://katsbloglove.blogspot.com/ so that section would look like this:
(<)a href="http://katsbloglove.blogspot.com/" target="_blank">
Where it says your picture direct link, copy the direct link I showed you above and put it in place of the red letters. Mine would look like this:(<)img src="http://i269.photobucket.com/albums/jj57/mommacow39/love-heart-1-1.jpg"/>
5. Remove all the parenthesis. I had to put them in to be able to show you the code. If I tried to just show you the code it would have just showed you my button :) They are all in red. Just delete them.6. Preview your blog and make sure it looks something like this where you put the blog button:

Ta Da! You now have a blog button!
For the free version of Wordpress:
1. Go to your Dashboard and under "Appearance" select "Widgets".
2. Add a "Text" widget to your sidebar (underneath the word TEXT it says "Arbitrary text or HTML").
3. Give it a title. Something like "Add my button" or whatever you want it to say.
4. Paste the following code into the text area:
(<)a href="YOUR BLOG URL" target="_blank"(><)img src="YOUR PICTURE DIRECT LINK" alt="YOUR PICTURE NAME" width="150" height="150" />
5. Change the URL, direct link and picture name. Remove parenthesis.
6. Now type the following code onto your notepad or some other word processing page:
(<)div style="border:1px solid #DDD;background:#F8F8F8 none repeat scroll 0 0;overflow:auto;height:100px;line-height:1.5em;margin:auto;padding:5px 10px;"(><)a href="YOUR BLOG URL" target="_blank"(><)img src="YOUR PICTURE DIRECT LINK" alt="YOUR PICTURE NAME" width="150" height="150" />
7. Change the URL, direct link and picture name. Remove parenthesis. Copy it.
8. Go here.
9. Paste the code into the box in the center of the screen and push the gray button that says "HTML to Text". (This is necessary because Wordpress assumes your HTML is incorrect and changes it...you have to fool them a little.) It will give you a code that looks something like this:
& lt; div style="border:1px solid #DDD;background:#F8F8F8 none repeat scroll 0 0;overflow:auto;height:100px;line-height:1.5em;margin:auto;padding:5px 10px;"><a href="http://theeatfoodnotmoneycookbook.wordpress.com" target="_blank"><img src="http://i269.photobucket.com/albums/jj57/mommacow39/cookbooktitle-2-1.jpg" alt="cookbookbutton" width="150" height="150" /></a></div & gt;
10. Paste that code underneath the first code you put in the text widget.
11. Hit save.
12. View your blog to make sure it looks right.
You're done! Congratulations! You now have a button on your Wordpress blog (a place that really doesn't like buttons as you can tell!).
Just leave me a comment if you have ANY questions. I can walk you through it step by step personally if I'm too confusing for you here. I totally understand that I CAN be confusing sometimes :)


2 of the people I love gave me love:
COOOOOOOOOOOOL!!!!!! I'm bookmarking this blog to do it when i have time.
Of COURSE you're not a lurker- you're like my bestest commenter ever :)))))
Wow thanks. I have been thinking about creating my own award and also a "I was featured on" button.
You have certainly racked up on winning things. Awesome
New comments are not allowed.